Some customers prefer to request certain items or services only when needed. In these cases, you’ll usually agree a price in advance, but only deliver and invoice when the customer contacts you. This guide explains how to add On Request Only items to an agreement, schedule their delivery, and invoice them once completed.
Adding an On Request Only item to an agreement
Go to the New Agreements, Pending Agreements, or Live Agreements screen under the Customers section and open the relevant agreement.
If you’re starting from scratch, see How to create a new agreement for help creating one.

Open the Items tab, then select Add On Request Only Item from the Add Item menu.

In the stock selector popup, choose the stock item you’d like to add and click OK.
You’ll be shown the agreement item form with the selected stock details pre-filled. The frequency and On Request Only checkbox will also be completed automatically.
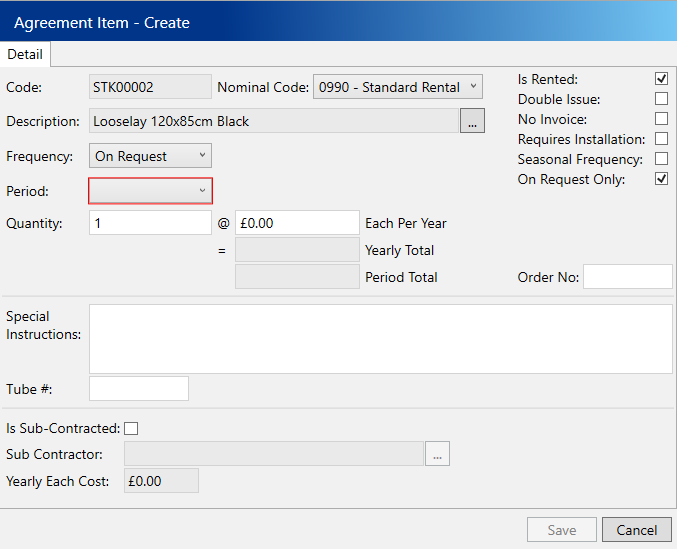
Enter the remaining details for the item:
- Period – The amount of months this item is valid for on the agreement
- Quantity – Total number of items available on request. This is useful if the item is in multiple placements, as customers may only request one at a time
- Each Per Year – The price per delivery for each item when it is serviced
Click Save to add the item to the agreement.
The item will now appear alongside any regular items, marked with the On Request Only icon. You can still allocate it to a placement, which helps track where your equipment is on site. However, these items cannot be assigned to the site’s delivery routes—they must be scheduled manually using delivery events.

Once the agreement is live, you’ll be able to schedule the item whenever the customer requests it.
Scheduling an On Request Only item for delivery
Navigate to the Site Delivery tab under the Customers section.

Use the search filters to locate the site where the item needs to be delivered.
Open the Delivery Events tab, then click Add On Request Item.

In the item selector popup, choose the relevant item and click OK.
Next, in the placement select popup, select the placement for the delivery.
You’ll then be shown the delivery event schedule form with the item details pre-filled.
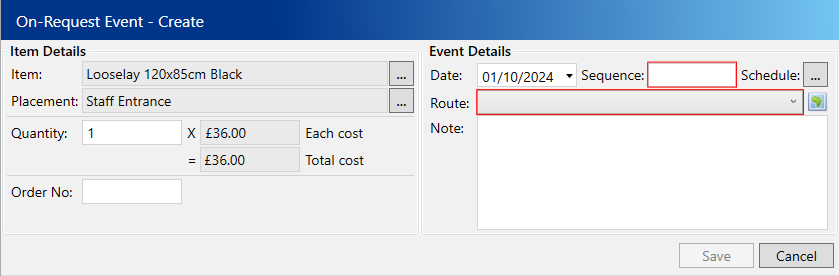
Enter the following compulsory fields:
- Date – Defaults to today, but can be set in advance
- Time – The route sequence time for the delivery
- Route– The route that will handle the delivery
Click Save to schedule the delivery. It will now appear on the manifest like a standard one-off job (e.g. installs or collections).
Invoicing an On Request Only item
When the delivery has been marked as serviced, an Invoice Event is automatically created.
These invoice events will be included the next time the associated account is invoiced. However, if the account is billed quarterly or annually, you may prefer to generate an invoice manually.
To do this:
Navigate to the Invoice Events tab under the Finance section.

Use the search filters to find the relevant event and select the site from the top grid.
Open the Event Items tab.
Select the items you’d like to invoice, then click Create Invoice on the toolbar.

You’ll be taken to the Invoices screen with all details pre-filled. Review the information, set the due date if needed, then click Save.
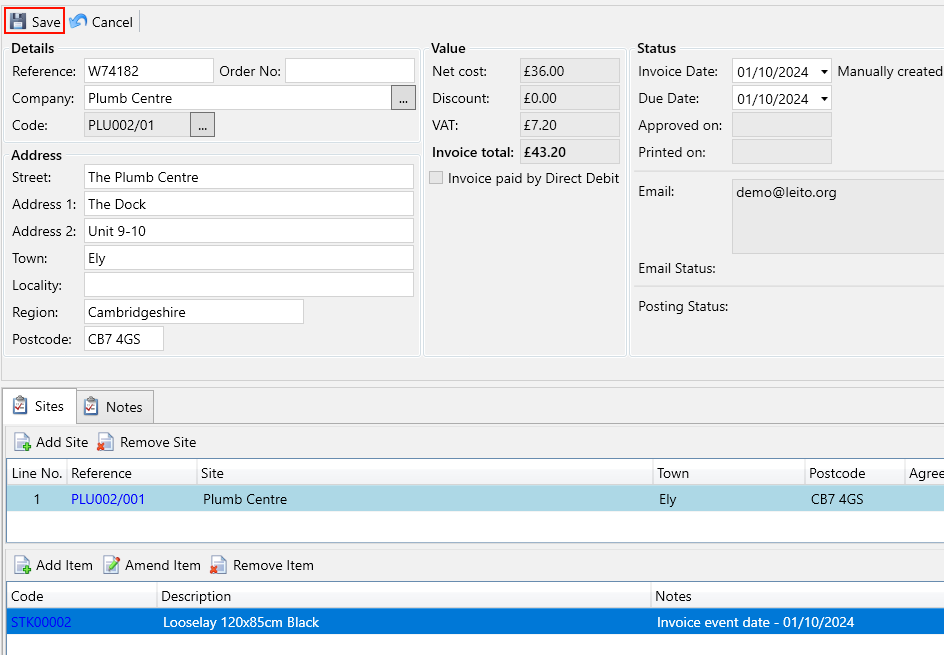
Your invoice is now ready to post or email as normal.
Tips & Reminders
- On-request items do not appear on the manifest automatically
- Useful when customers request additional mats, toilet rolls, or bins on an ad-hoc basis
- You can bill the item straight away or let it be picked up in the next invoice run
Video walkthrough
Please see the video below for a detailed example of using On Request Only items.